At first when I tried to learn anatomy I had no idea where to start. I had the books, but each time I looked at them I was lost. What was I supposed to do with all this information? How was I supposed to learn it all, let alone use it? How, exactly, was any of this actually going to help my drawing?
More books, several courses, studying and drawing later I feel like I have developed a useful approach/range of tools which gives me a solid platform on which to build my knowledge. I’m sharing this with you, firstly because it’s no fun being stuck on this stuff and secondly because it’s actually a great way to clarify and consolidate my ideas and understanding.
I was really struggling. Each time I sat down with my anatomy books it was just a mass of lines and Latin names. I couldn’t make sense of the information. With the benefit of 20:20 hindsight I can see that my issues boiled down into two basic problems:
- Feeling overwhelmed and
- Not knowing where to start
I realised that by identifying the issues, I could already see or easily find, solutions. I decided to apply the same logic to creating a strategy to help me learn anatomy. Having struggled for sometime the first thing to address was my motivation: How and why is this going to help me?
Where to start – with Why?
I spent some time thinking about why I wanted to learn anatomy – specifically what I wanted to:
- Avoid errors
- Help me learn to ‘see’ in drawing
- Move on from studies to finished work
- Convey tension, gesture and expression.
There are more details on this in my post Why learn anatomy? But these are the key goals that I used to build my strategy.
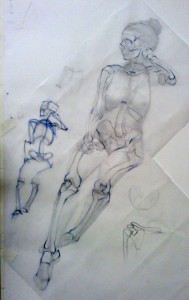
Now that I am studying at LARA I’m getting some great opportunities to study anatomy. The tutors suggest different approaches and correct my errors. On of the key exercises we do is écorché drawing; anatomy studies overlaid on our own figure drawings. It is so helpful to be able to reference and relate anatomical knowledge to the figure I have spent up to 4 weeks studying. The image below shows a pencil drawing with the skeleton drawn on a tracing paper overlay.

The blue marks on the main drawing show bony landmarks; where the presence of the bones beneath is very apparent, as with knees for example. The smaller all blue sketch is an abstraction of the skeleton, intended to help conceptualise the shapes and stuctures.
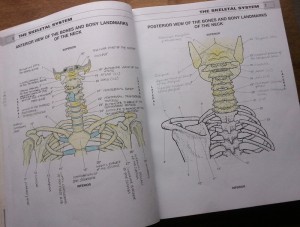
Many professions use anatomy so I thought it might be helpful to ask them for their learning strategies. My physiotherpist recommended the Musculoskeletal Anatomy Colouring Book – which is brilliant. Almost as much fun as it was when I was 5 years old this book utilises the principles of kinaesthetic learning (yes, the colouring part) to have you recognising and labelling bones, bony processes and muscles in various orientations, all with much less effort than it took to stay inside the lines when you were little.

The book does require that you actively engage with it, rather than just mindlessly fill in. I tend to colour and label a bone or bony process at a time, ensuring that I work from memory as much as possible. Doing a couple of pages with different views immediately after each other helps to reinforce the relationships between bones and to a lesser extent their 3 dimensional qualities.
I’m working on some other anatomy strategies, so do visit my anatomy page for more posts.


